6 Calibre
Visió general
El giny de calibre mostra el valor d'un sol element com a calibre.
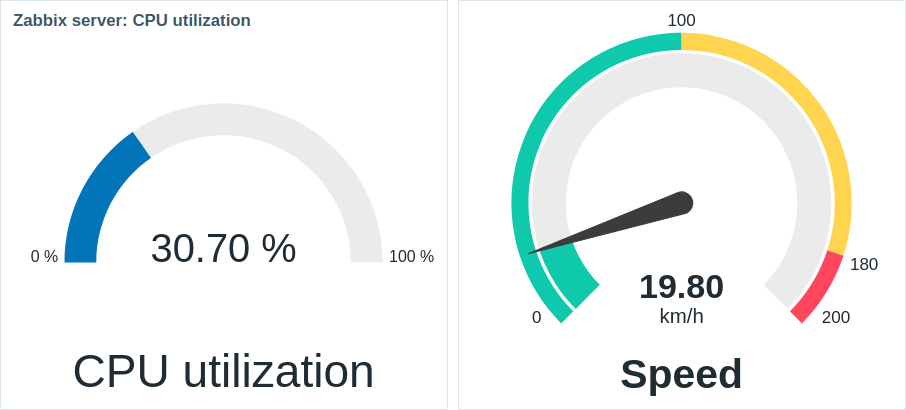
Quan és configurat, el giny pot constar dels elements següents:
- Descripció de l'element (per exemple, "Ús de la CPU", "Velocitat")
- Valor de l'element (per exemple, "30,70", "19,80")
- Unitats de valor de l'article (per exemple, "%", "km/h")
- Escala de mesura (per exemple, "0%/100%", "0/100/180/200")
- Arc de calibre (arc de valor de calibre i arc de llindars de calibre)
- Agulla de calibre
El giny es pot ajustar visualment amb les opcions de Configuració avançada per crear una gran varietat d'estils visuals:
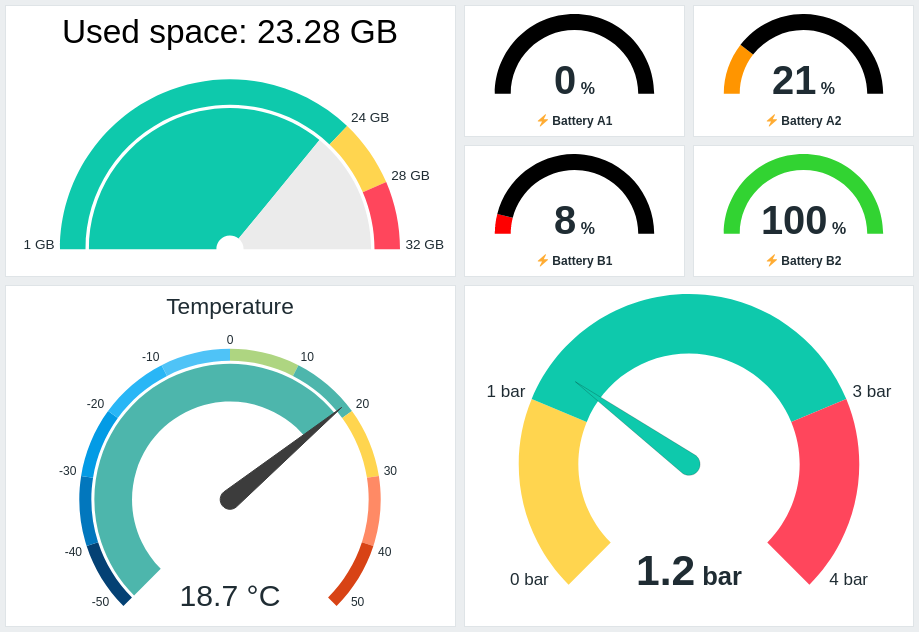
El giny calibre només pot mostrar valors numèrics. No s'admet la visualització de valors binaris.
Si feu clic al giny de calibre, es mostra un gràfic per a l'element.
Configuració
Per configurar, trieu Calibre com a tipus:
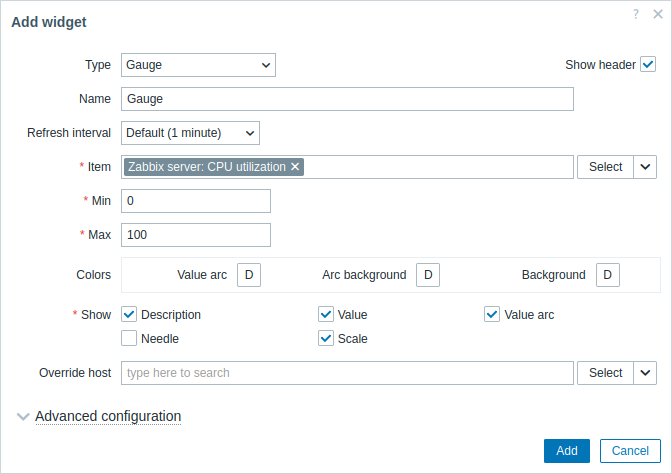
A més dels paràmetres que són comuns per a tots els ginys, podeu establir les opcions específiques següents:
| Element | Trieu l'element. Com a alternativa, trieu un giny compatible com a font de dades per als elements. Aquest camp s'emplena automàticament, de manera que començant a escriure el nom d'un element oferirà un menú desplegable d'elements coincidents. Tingueu en compte que només podeu triar els elements que retornin dades numèriques. |
| Min | Introduïu el valor mínim de l'indicador. S'admeten Sufixos (per exemple, "1d", "2w", "4K", "8G"). Els mapatges de valors són compatibles. |
| Max | Introduïu el valor màxim de l'indicador. S'admeten Sufixos (per exemple, "1d", "2w", "4K", "8G"). Els Mapatges de valors són compatibles. |
| Colors | Trieu el color del selector de colors: Arc de valor - trieu el color de l'arc del valor del calibre; Fond d'arc - trieu el fons del valor del calibre i l'arc dels llindars del calibre color; Fons - trieu el color de fons del giny. "D" significa el color predeterminat, que depèn del tema de la interfície. Si s'estableixen Llindars, el color predeterminat per a Arc de valor depèn del color del llindar. Per tornar al color predeterminat, feu clic al botó Emprar predeterminat al selector de colors. |
| Veure | Marqueu la casella de selecció per mostrar l'element de calibre respectiu: descripció, valor, arc de valor, agulla, escala (el valor mínim i màxim del calibre al principi i al final de l'arc del calibre). Desmarcar per amagar. S'ha de triar almenys un element. Tingueu en compte que l'agulla i l'escala del calibre es poden veure si es mostra l'arc del valor del calibre o l'arc dels llindars del calibre (veieu les opcions configuració avançada). Tingueu en compte també que si es mostra l'agulla del calibre, el valor es posa sota l'agulla; si l'agulla és amagada, el valor s'alinea amb la part inferior de l'arc de calibre. |
| Substitueix l'equip | Seleccioneu un giny compatible o el tauler com a font de dades per als equips. Aquest paràmetre no és pas disponible en configurar el giny en un tauler de control de plantilla. |
| Configuració avançada | Feu clic a l'etiqueta Configuració avançada per veure les opcions de configuració avançada. Aquí també podreu ajustar els elements de calibre triats al camp Veure. |
Configuració avançada
Les opcions de configuració avançades són disponibles a la secció plegable Configuració avançada:
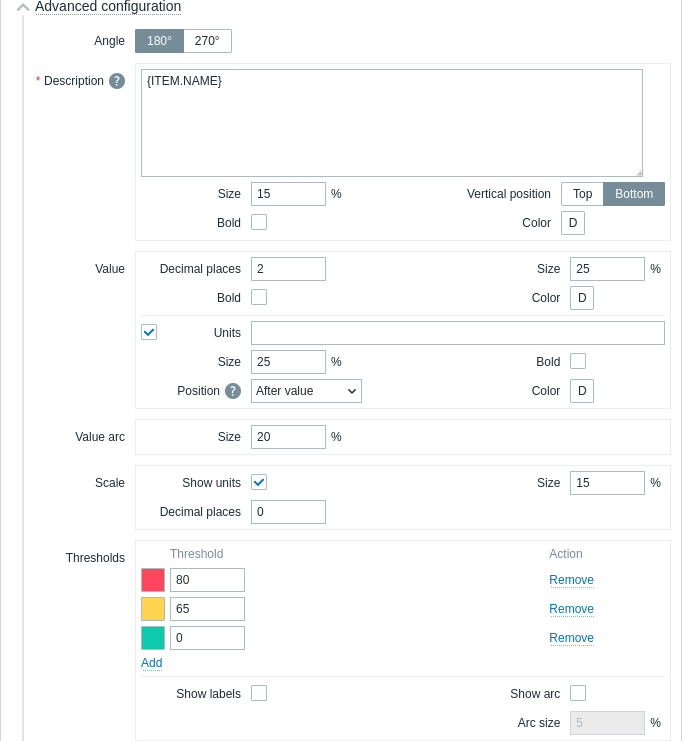
| Angle | Trieu l'angle de calibre (180° o 270°). |
| Descripció | |
| Descripció | Introduïu la descripció de l'element. Aquesta descripció pot substituir el nom de l'element predeterminat. S'admeten descripcions de diverses línies. És possible una combinació de text i macros admeses. S'admeten {HOST.*}, {ITEM.*}, {INVENTORY.*} i les macros d'usuari. |
| Mida | Introduïu l'alçada de la mida del tipus de lletra per a la descripció de l'element (en percentatge, en relació amb l'alçada total del giny). |
| Posició vertical | Trieu la posició vertical de la descripció de l'element (superior o inferior, en relació amb l'arc de calibre). |
| Negreta | Marqueu la casella de selecció per mostrar la descripció de l'element en negreta. |
| Color | Trieu el color de la descripció de l'element al selector de colors. "D" significa el color predeterminat, que depèn del tema de la interfície. Per tornar al color predeterminat, feu clic al botó Empra per defecte al selector de colors. |
| Valor | |
| Llocs decimals | Introduïu el nombre de decimals per mostrar amb el valor. Aquesta opció només afecta els elements que retornen dades numèric (flotant). |
| Mida | Introduïu l'alçada de la mida de la lletra per al valor (en percentatge, en relació amb l'alçada de l'arc de calibre). |
| Negreta | Marqueu la casella de selecció per mostrar el valor en negreta. |
| Color | Trieu el color del valor del selector de colors. "D" significa el color predeterminat, que depèn del tema de la interfície. Per tornar al color predeterminat, feu clic al botó Empra per defecte al selector de colors. |
| Unitats | |
| Unitats | Marqueu la casella de selecció per mostrar les unitats amb el valor de l'element. Si introduïu un nom d'unitat, anul·larà les unitats establertes a la configuració de l'element . |
| Mida | Introduïu l'alçada de la mida de la lletra per a les unitats de l'element (en percentatge, en relació amb l'alçada de l'arc de calibre). |
| Negreta | Marqueu la casella de selecció per mostrar les unitats d'elements en negreta. |
| Posició | Trieu la posició de les unitats d'element (a sobre, a sota, abans o després, en relació amb el valor de l'element). Aquesta opció s'ignora per a les unitats relacionades amb el temps següents elements/item#configuration): unixtime, uptime, s. |
| Color | Trieu el color de les unitats de l'element al selector de colors. "D" significa el color predeterminat, que depèn del tema de la interfície. Per tornar al color predeterminat, feu clic al botó Empra per defecte al selector de colors. |
| Arc de valor | |
| Mida de l'arc | Introduïu l'alçada de la mida de l'arc del valor del calibre (en percentatge, en relació amb el radi de l'arc del calibre). |
| Agulla | |
| Color | Trieu el color de l'agulla del calibre al selector de colors. "D" significa el color predeterminat, que depèn del tema de la interfície. Si s'estableixen Llindars, el color predeterminat de l'agulla depèn del color del llindar. Per tornar al color predeterminat, feu clic al botó Usa predeterminat al selector de colors. |
| Escala | |
| Mostra unitats | Marqueu la casella de selecció per mostrar les unitats amb el valor mínim i màxim de l'indicador. |
| Mida | Introduïu l'alçada de la mida del tipus de lletra per al valor mínim i màxim del calibre (en percentatge, en relació amb l'alçada de l'arc del calibre). |
| Llocs decimals | Introduïu el nombre de decimals per mostrar amb el valor mínim i màxim de l'indicador. Aquesta opció només afecta els elements que retornen numeric (float) dades. |
| Llindars | |
| Llindars | Feu clic a Afegeix per afegir un llindar, seleccioneu un color de llindar del selector de colors i especifiqueu un valor numèric. La llista de llindars s'ordenarà en ordre ascendent quan es desi. Tingueu en compte que els colors configurats com a llindars només es mostraran correctament per als elements numèrics. S'admeten Sufixos (per exemple, "1d", "2w", "4K", "8G"). Les mapes de valors són compatibles. |
| Mostra les etiquetes | Marqueu la casella de selecció per mostrar els valors de llindar com a etiquetes a l'escala del calibre. |
| Mostra l'arc | Marqueu la casella de selecció per mostrar l'arc dels llindars de mesura. |
| Mida de l'arc | Introduïu l'alçada de la mida de l'arc dels llindars de calibre (en percentatge, en relació amb el radi de l'arc de calibre). |
La informació que ensenya el giny del calibre es pot descarregar com a imatge .png mitjançant el menú del giny:
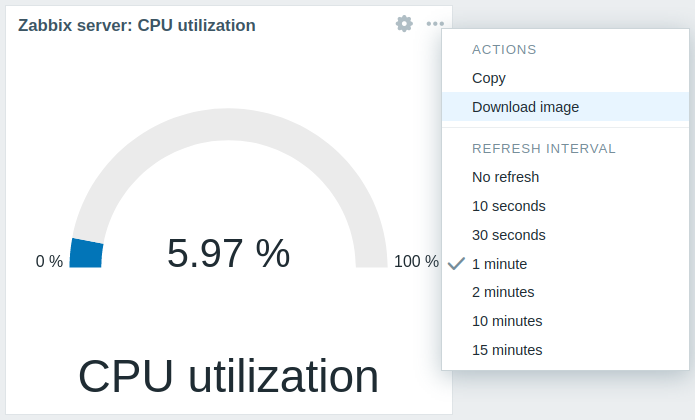
Es desarà una captura de pantalla del giny a la carpeta Descàrregues.
