19 浏览器 监控项
概述
浏览器 监控项 允许通过浏览器监控复杂的网站和Web应用程序。
当前浏览器 监控项 功能处于实验性支持阶段。
浏览器 监控项 通过执行用户定义的JavaScript代码并通过HTTP/HTTPS检索数据来收集信息。该 监控项 能够模拟点击、输入文本、网页导航等与网站或Web应用程序相关的用户交互行为。
除了脚本外,还可以指定可选的参数列表(名称-值对)和超时设置。
该 监控项 部分实现了 W3C WebDriver standard 标准,可使用Selenium Server或原生WebDriver(如ChromeDriver)作为Web测试端点。要使 监控项 正常工作,需在Zabbix webdriverurl/webdriverurl 配置 file 的 WebDriverURL 参数中设置端点(若使用ChromeDriver,请参阅 Security Considerations)。为获得更佳性能,建议为Web测试环境使用专用服务器。
浏览器 监控项 检查由 Zabbix server 或 proxy 浏览器轮询器执行处理。必要时,可通过Zabbix startbrowserpollers/startbrowserpollers 配置 file 的 StartBrowserPollers 参数调整浏览器轮询器的预派生实例数量。
对于复杂网站和Web应用的监控,可使用 Website by Browser 模板作为 out-of-the-box template。
配置
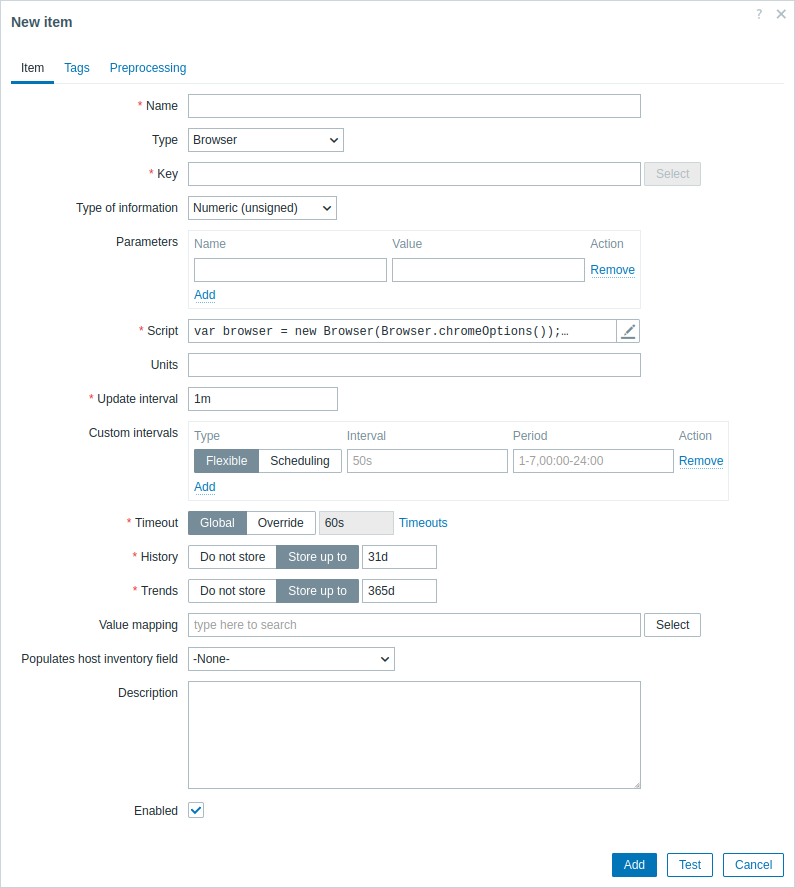
在 item configuration form 的 类型(Type) 字段中选择浏览器(Browser),然后填写必填字段。

所有必填输入字段均以红色星号标记。
浏览器(Browser)监控项 需要填写的特定信息字段如下:
| 字段 | 描述 |
|---|---|
| Key | 输入一个唯一的键,用于标识该 监控项。 |
| Parameters | 指定作为属性和值对传递给脚本的变量。 支持 User macros。要查看支持哪些内置宏,请在 supported macro 表格中搜索“浏览器类型(Browser-type)监控项”。 |
| Script | 单击参数字段内或其旁边的铅笔图标时,将在打开的模态编辑器中输入 JavaScript 代码。该代码必须提供返回指标值的逻辑。 代码可以访问所有参数、所有 additional JavaScript objects 和 Zabbix 添加的 Browser item JavaScript objects。 另请参阅:JavaScript Guide。 |
| Timeout | JavaScript 执行超时时间(1-600 秒;超过该时间将返回错误)。 请注意,根据脚本的不同,触发超时可能需要更长时间。 有关 超时(Timeout) 参数的更多信息,请参见 配置。 |
示例
有关如何使用 Website by Browser 模板配置 Zabbix 以监控网站的示例,请参见 Monitor websites with Browser items。
默认脚本
以下脚本:
- 初始化浏览器会话。
- 导航到指定的 URL。
- 收集性能条目和会话统计信息,并将它们以 JSON string 格式返回。
在 Script 字段中输入:
var browser = new Browser(Browser.chromeOptions());

       try {
           browser.navigate("http://example.com");
           browser.collectPerfEntries();
       }
       finally {
           return JSON.stringify(browser.getResult());
       }
使用自定义功能初始化浏览器
以下脚本:
- 根据脚本中指定的顺序中的第一个匹配浏览器,为可用浏览器初始化浏览器会话。
- 定义浏览器功能,包括页面加载策略和特定于每个浏览器的选项,例如 Chrome、Firefox 和 Microsoft Edge 浏览器的无头模式。
在 脚本 字段中输入:
var browser = new Browser({
           "capabilities":{
               "firstMatch":[
                   {
                       "browserName":"chrome",
                       "pageLoadStrategy":"normal",
                       "goog:chromeOptions":{
                           "args":[
                               "--headless=new"
                           ]
                       }
                   },
                   {
                       "browserName":"firefox",
                       "pageLoadStrategy":"normal",
                       "moz:firefoxOptions":{
                           "args":[
                               "--headless"
                           ]
                       }
                   },
                   {
                       "browserName":"MicrosoftEdge",
                       "pageLoadStrategy":"normal",
                       "ms:edgeOptions":{
                           "args":[
                               "--headless=new"
                           ]
                       }
                   },
                   {
                       "browserName":"safari",
                       "pageLoadStrategy":"normal"
                   }
               ]
           }
       });
使用GUI初始化浏览器
默认情况下,浏览器会话(不包括Safari)以无头模式初始化,这意味着不会显示浏览器的图形用户界面(GUI)。
以下脚本将以启用GUI的方式初始化浏览器会话。
请注意,如果WebDriver无法找到浏览器可执行文件,您可以手动指定其路径。
var opts = Browser.chromeOptions();
       opts.capabilities.alwaysMatch['goog:chromeOptions'].args = [];

       // To initialize a Firefox session with GUI, uncomment the following lines:
       // var opts = Browser.firefoxOptions();
       // opts.capabilities.alwaysMatch['moz:firefoxOptions'].binary = 'usr/bin/firefox';
       // opts.capabilities.alwaysMatch['moz:firefoxOptions'].args = [];

       // To initialize a Microsoft Edge session with GUI, uncomment the following lines:
       // var opts = Browser.edgeOptions();
       // opts.capabilities.alwaysMatch['ms:edgeOptions'].binary = 'usr/bin/microsoft-edge';
       // opts.capabilities.alwaysMatch['ms:edgeOptions'].args = [];

       var browser = new Browser(opts);
如果您的测试是在远程服务器或容器中运行,您可以使用虚拟网络计算(VNC)客户端连接到该机器的VNC服务器。 这样就可以远程查看和操作浏览器的GUI界面。
截图
以下脚本:
- 初始化浏览器会话。
- 设置浏览器视口大小以确定截图大小(作为参数指定,见下文)。
- 导航到一个URL(作为参数指定,见下文)。
- 收集会话统计信息,捕获截图,并将其添加到收集的统计信息中。
- 通过捕获错误消息和截图来处理错误。
- 将收集到的结果作为JSON string返回。
该脚本还使用来自监控项 配置表单的参数:
- webURL - http://example.com
- width - 1920
- height - 1080
在脚本字段中输入:
var browser, result;

       var browser = new Browser(Browser.chromeOptions());

       try {
           var params = JSON.parse(value); // Parse the JSON string containing parameters passed from Zabbix.

           browser.setScreenSize(Number(params.width), Number(params.height))

           browser.navigate(params.webURL);

           result = browser.getResult();
           result.screenshot = browser.getScreenshot();
       }
       catch (err) {
           if (!(err instanceof BrowserError)) {
               browser.setError(err.message);
           }
           result = browser.getResult();
           result.error.screenshot = browser.getScreenshot();
       }
       finally {
           return JSON.stringify(result);
       }
检查Zabbix登录
以下脚本:
- 初始化浏览器会话。
- 导航到一个页面(作为参数指定,见下文)。
- 输入用户名和密码(作为参数指定,见下文)。
- 查找并点击 login 按钮。
- 查找并点击 logout 按钮。
- 在登录前后以及登出后收集性能数据。
- 通过捕获错误消息和屏幕截图处理错误。
- 将收集到的结果作为 JSON string 返回。
该脚本还使用来自 监控项 配置表 的参数:
- webURL - http://{HOST.CONN}/index.php
- username - {$USERNAME}
- password - {$PASSWORD}
在 Script 字段中输入:
var browser, result;

       browser = new Browser(Browser.chromeOptions());

       try {
           var params = JSON.parse(value); // Parse the JSON string containing parameters passed from Zabbix.

           browser.navigate(params.webURL);
           browser.collectPerfEntries("open page");

           var el = browser.findElement("xpath", "//input[@id='name']");
           if (el === null) {
               throw Error("cannot find name input field");
           }
           el.sendKeys(params.username);

           el = browser.findElement("xpath", "//input[@id='password']");
           if (el === null) {
               throw Error("cannot find password input field");
           }
           el.sendKeys(params.password);

           el = browser.findElement("xpath", "//button[@id='enter']");
           if (el === null) {
               throw Error("cannot find login button");
           }
           el.click();

           browser.collectPerfEntries("login");

           el = browser.findElement("link text", "Sign out");
           if (el === null) {
               throw Error("cannot find logout button");
           }
           el.click();

           browser.collectPerfEntries("logout");

           result = browser.getResult();
       }
       catch (err) {
           if (!(err instanceof BrowserError)) {
               browser.setError(err.message);
           }
           result = browser.getResult();
           result.error.screenshot = browser.getScreenshot();
       }
       finally {
           return JSON.stringify(result);
       }
查找链接
以下脚本:
- 初始化浏览器会话。
- 定义一个用于从array中移除重复元素的函数(参见步骤5)。
- 导航到指定页面(作为参数指定,请参见下文)。
- 查找页面上的链接。
- 移除重复的链接,确保它们唯一。
- 提取以"http"开头的链接。
- 将提取的链接格式化为特定结构。
- 通过捕获错误信息和截图来处理错误。
- 将收集到的结果作为JSON string返回。
该脚本还使用了来自监控项 配置表单的参数:
- scheme - {$WEBSITE.SCHEME}
- domain - {$WEBSITE.DOMAIN}
- path - {$WEBSITE.PATH}
在Script字段中输入:
var browser, result;

       browser = new Browser(Browser.chromeOptions());

       try {
           var params = JSON.parse(value);  // Parse the JSON string containing parameters passed from Zabbix.

           function uniq(a) {
               return a.sort().filter(function (item, pos, ary) {
                   return !pos || item != ary[pos - 1];
               });
           }

           browser.navigate(params.scheme + '://' + params.domain + params.path);

           var el = browser.findElements("link text", "");
           var links = [];
           for (var n = 0; n < el.length; n++) {
               links.push(el[n].getAttribute('href'));
           }

           links = uniq(links);

           result = [];
           for (i = 0; i < links.length; i++) {
               if (links[i].match(/^http.*/)) {
                   var row = {};
                   row["{#URL}"] = links[i];
                   result.push(row);
               }
           }
       }
       catch (err) {
           if (!(err instanceof BrowserError)) {
               browser.setError(err.message);
           }
           result = browser.getResult();
           result.error.screenshot = browser.getScreenshot();
       }
       finally {
           return JSON.stringify(result);
       }
