Table of Contents
9 Monitor website certificates with Zabbix agent 2 (passive)
Introduction
This guide provides a comprehensive overview of how to set up and monitor SSL/TLS certificates using the web.certificate.get key in Zabbix agent 2. It is designed to simplify certificate monitoring for single or multiple websites, ensuring administrators can quickly identify potential issues such as expired or invalid certificates.
Who this guide is for
This guide is designed for new Zabbix users and contains the minimum set of steps required to enable basic monitoring of website certificates. If you are looking for deep customization options or require more advanced configuration, see Configuration section of Zabbix manual.
Prerequisites
Before proceeding with this guide, you need to download and install Zabbix server, Zabbix frontend, and Zabbix agent 2 according to the instructions for your OS. This tutorial assumes that both the Zabbix server and agent are installed on the same machine; therefore, 127.0.0.1 is used in the configuration.
Configure Zabbix agent 2
1. Open the Zabbix agent configuration file (default path: /etc/zabbix/zabbix_agent2.conf):
2. Set the Server parameter to 127.0.0.1, since the agent and server are running on the same machine:
3. Save the file and restart the Zabbix agent 2 service:
4. After setup and configuring Zabbix agent 2, test its availability with:
Zabbix agent 2 includes the WebCertificate plugin by default, so no separate installation or configuration is required.
Configure Zabbix frontend
1. Log into Zabbix frontend.
2. Navigate to Monitoring > Hosts.
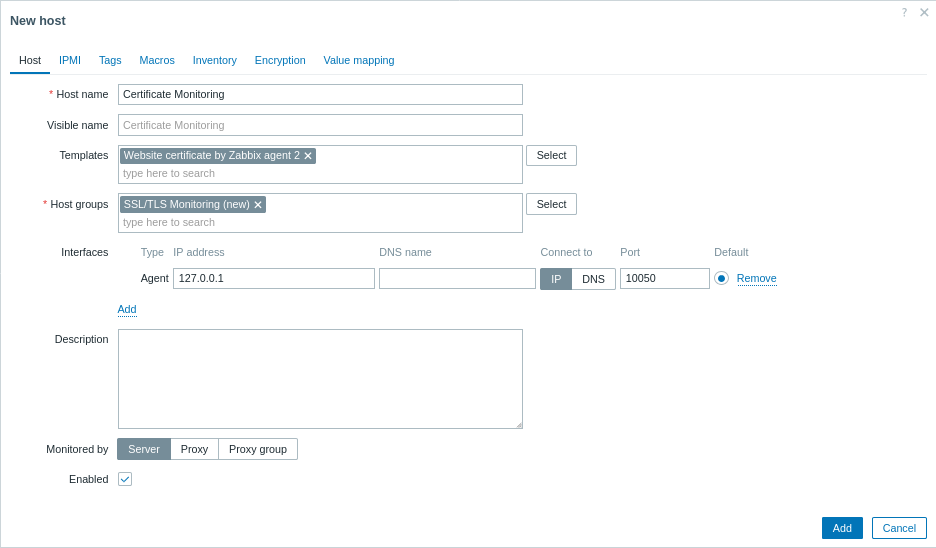
3. Click on an existing host where you want to monitor website certificates, or create a host if necessary:
- In the Host name field, enter a host name (e.g., "Certificate Monitoring").
- In the Templates field, type or select the template "Website certificate by Zabbix agent 2" that will be linked to the host.
- In the Host groups field, type or select a host group (e.g., "SSL/TLS Monitoring").
- In the Interfaces field, add an interface of type "Agent" and specify an IP address. For this example, "127.0.0.1" is used.
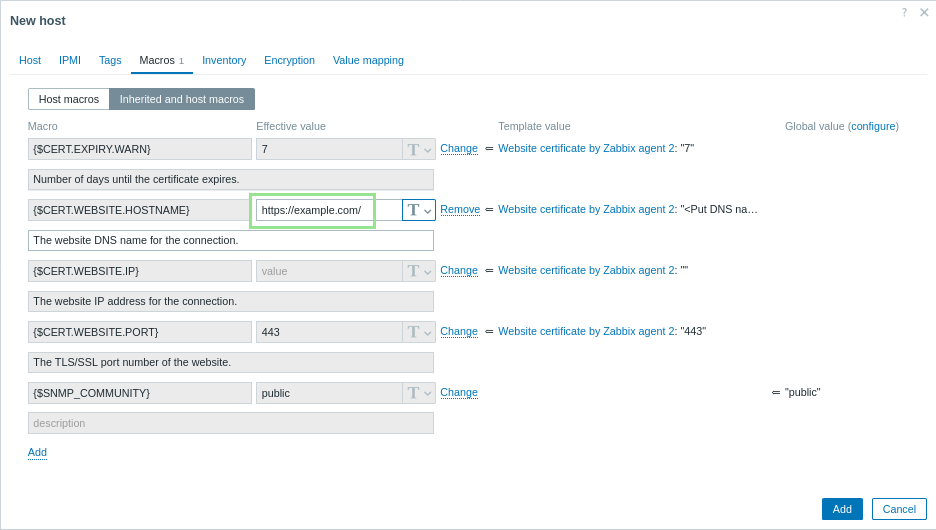
- In the Macros tab, switch to Inherited and host macros, look for the following macros and click on Change next to the macro value to update it:
{$CERT.WEBSITE.HOSTNAME}- enter the desired website DNS name as the value.
4. Click on Add to add the host.
To monitor multiple websites, repeat the steps above to create separate hosts for each website. Each host should use the "Website certificate by Zabbix agent 2" template and be configured with the corresponding macros. To simplify the process, consider cloning existing hosts. When cloning, make sure to update both the Host name and the {$CERT.WEBSITE.HOSTNAME} macro with the desired values.
View collected metrics
Congratulations! At this point, Zabbix is already monitoring desired web certificate.
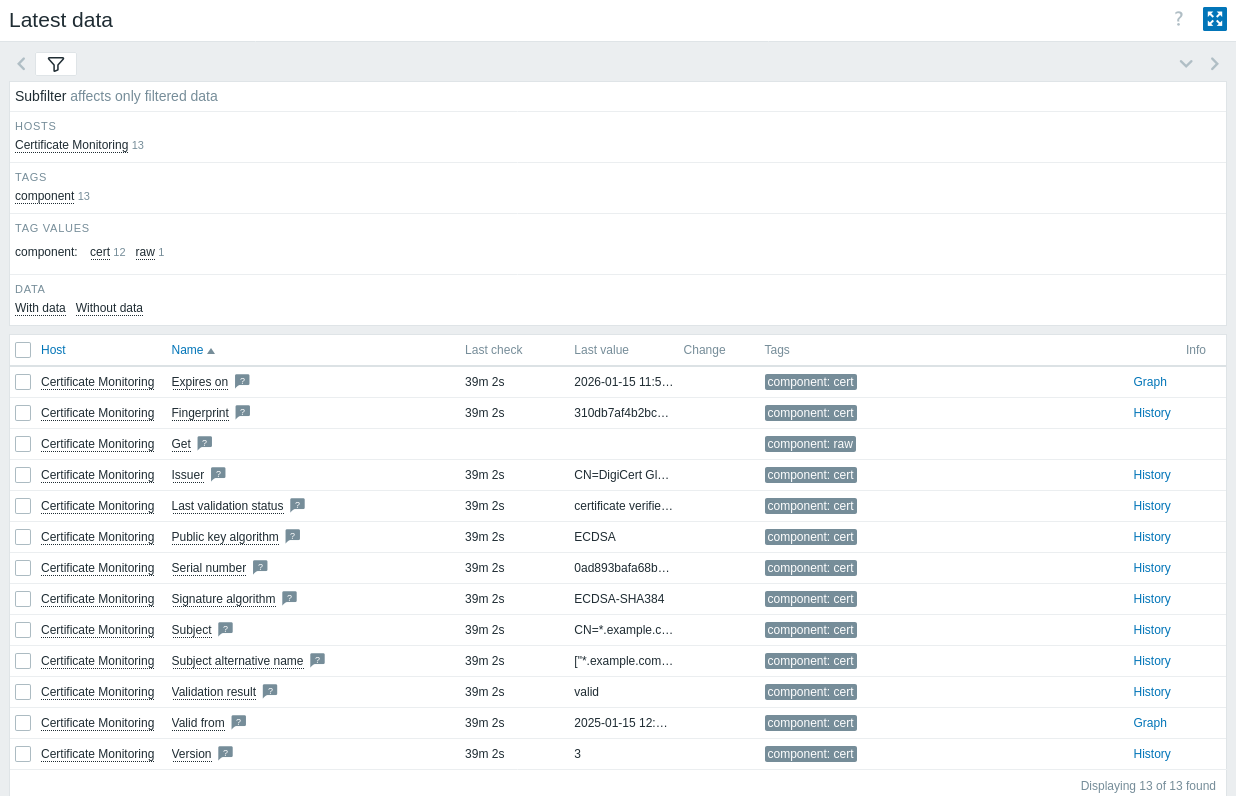
To view collected metrics, navigate to the Monitoring > Hosts menu section and click on Latest data next to the host to view all the latest collected metrics in a list, like expiration date, issuer, and subject.
Set up problem alerts
Zabbix can notify you about infrastructure issues. This guide provides basic configuration steps for sending email alerts.
1. Navigate to User settings > Profile, switch to the Media tab and add your email.

2. Follow the guide for Receiving a problem notification.
Next time, when Zabbix detects a problem, you should receive an alert via email.
Test your configuration
To test your configuration, we can simulate a real problem by updating the host configuration in Zabbix frontend.
1. Open your "Certificate Monitoring" host configuration in Zabbix.
2. Switch to the Macros tab and select Inherited and host macros.
3. Click on Change next to the previously configured {$CERT.EXPIRY.WARN} macro value and set a very high number of days (greater than 365 days should be sufficient) to receive a warning before the certificate expires.
4. Click on Update to update the host configuration.
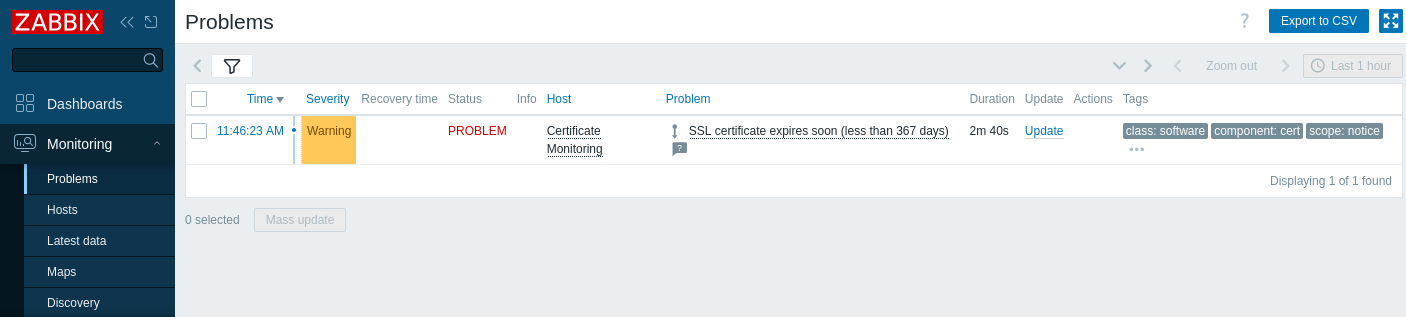
5. In a few moments, Zabbix will detect the problem "SSL certificate expires soon", with the number of days until expiration. The problem will appear in Monitoring > Problems.
If alerts are configured, you will also receive the problem notification.
6. Change the macro value back to its previous value to resolve the problem and continue monitoring the certificate values.
See also
- Zabbix agent 2 - lists item keys.
- Template Website certificate by Zabbix agent 2 - additional information about the Website certificate by Zabbix agent 2 template.
- Template Website certificate by Zabbix agent 2 active - additional information about the Website certificate by Zabbix agent 2 active template.
- Monitor websites with Browser items - how to start basic monitoring of websites with Browser items.