Is this not what you were looking for? Switch to the current version or choose one from the drop-down menu.
5 Receiving problem notification
Overview
In this section you will learn how to set up alerting in the form of notifications in Zabbix.
With items collecting data and triggers designed to "fire" upon problem situations, it would also be useful to have some alerting mechanism in place that would notify us about important events even when we are not directly looking at Zabbix frontend.
This is what notifications do. E-mail being the most popular delivery method for problem notifications, we will learn how to set up an e-mail notification.
E-mail settings
Initially there are several predefined notification delivery methods in Zabbix. E-mail is one of those.
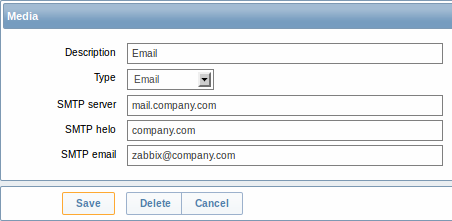
To configure e-mail settings, go to Administration → Media types and click on Email in the list of pre-defined media types.

This will present us with the e-mail settings definition form.

Set the values of SMTP server, SMTP helo and SMTP e-mail to the appropriate for your environment.
'SMTP email' will be used as the 'From' address for the notifications sent from Zabbix.
Press Save when ready.
Now you have configured 'Email' as a working media type. A media type must be linked to users by defining specific delivery addresses (like we did when configuring a new user), otherwise it will not be used.
New action
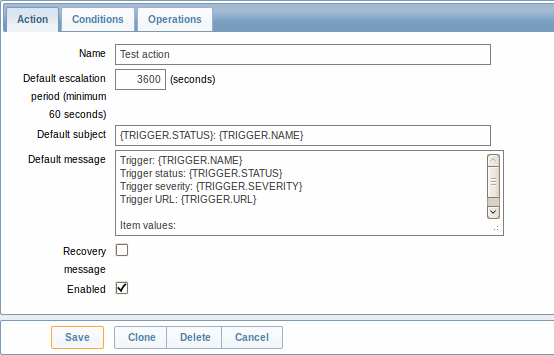
Delivering notifications is one of the things actions do in Zabbix. Therefore, to set up a notification, go to Configuration → Actions and click on Create action.

In this form, enter a name for the action.
{TRIGGER.STATUS} and {TRIGGER.NAME} macros (or variables), visible in the Default subject and Default message fields, will be replaced with the actual trigger status and trigger name values.
In the most simple case, if we do not add any more specific conditions, the action will be taken upon any trigger change from 'Ok' to 'Problem'.
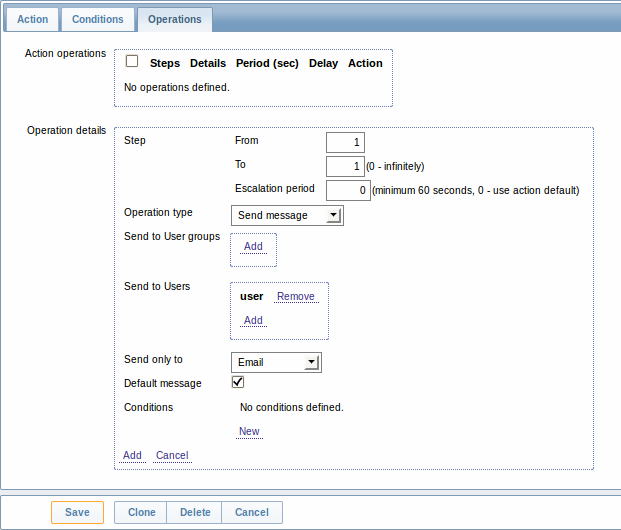
We still should define what the action should do - and that is done in the Operations tab. Click on New in there, which opens a new operation form.

Here, click on Add in the Send to Users block and select the user ('user') we have defined. Select 'Email' as the value of Send only to. When done with this, click on Add.
That is all for a simple action configuration, so click Save in the action form.
Receiving notification
Now, with delivering notifications configured it would be fun to actually receive one. To help with that, we might on purpose increase the load on our host - so that our trigger "fires" and we receive a problem notification.
Open the console on your host and run:
You may run one or several of these processes.
Now go to Monitoring → Latest data and see how the values of 'CPU Load' have increased. Remember, for our trigger to fire, the 'CPU Load' value has to go over '2' for 3 minutes running. Once it does:
- in Monitoring → Triggers you should see the trigger with a flashing 'Problem' status
- you should receive a problem notification in your e-mail
If notifications do not work:
- verify once again that both the e-mail settings and the action have been configured properly
- make sure the user you created has at least read permissions on the host which generated the event, as noted in the Adding user step. The user, being part of the 'Network administrators' user group must have at least read access to 'Linux servers' host group that our host belongs to.
- Additionally, you can check out the action log by going to Administration → Audit, and choosing Actions in the dropdown, located in the upper right corner.
