Is this not what you were looking for? Switch to the current version or choose one from the drop-down menu.
2 Nodes
Overview
You can use nodes to build a hierarchy of distributed monitoring.
Each node is a full Zabbix server and is responsible for monitoring its own location. Zabbix supports up to a thousand nodes in a distributed setup.
The benefits of using a node setup:
- building a multi-level hierarchy of monitoring in a large network involving several geographical locations. A node in the hierarchy reports to its master node only.
- a node can be configured locally or through its master node, which has a copy of configuration data of all child nodes.
- data gathering becomes more immune to possible communication problems. If communication between a master and a child node breaks down, nodes can keep operating. Historical information and events are stored locally. When communication is back, a child node will optionally send the data to the master node.
- the nodes can split the work of a single Zabbix server having to monitor thousands of hosts
- attaching and detaching new nodes does not affect the functionality of the existing setup. No restart of any node required.
Platform independence
A node may use its own platform (OS, hardware) and database engine independently of other nodes. Also child nodes can be installed without Zabbix frontend.
The nodes of higher levels should use a combination of better hardware with MySQL InnoDB, Oracle or PostgreSQL backend.
A distributed monitoring setup will not work with an SQLite backend database.
Configuration
Node configuration
A Zabbix server installed by following the standard installation procedure is not configured as a node for a distributed setup.
To configure it as a node:
- Specify a unique NodeID in the server configuration file (zabbix_server.conf). Available values: 1-999 ('0' being the default value of a standalone server)
- Stop zabbix_server, make sure that it is NOT running
- Convert database data for a distributed setup, by running:
Run this command only once. Running it twice will corrupt the database, so make sure that you run it with the correct node id.
It is strongly recommended to stop Apache web server before the conversion step.
For example, you may run (if NodeID is '1'):
Running zabbix_server with the -n option does not start the server process.
In a very simple setup, we may envisage this node (with NodeID=1) as the master, and go on to configure another Zabbix server as a child node, using the same procedure, only using a different node identifier, say, '2'. With two nodes configured, it is time to add them in the Zabbix front-end, in a very simple master-child relationship.
Front-end configuration (master node)
To configure the master node, open its Zabbix frontend:
- Go to: Administration → DM
- Make sure that Nodes are selected in the dropdown to the right
- Click on Local node to review its parameters

Node attributes:
| Parameter | Description |
|---|---|
| Name | Unique node name. |
| Id | Unique node ID. This is the value of NodeID from the configuration file. |
| Type | Local - the local node |
| IP | IP address of the local node. Zabbix trapper must be listening on this IP address. |
| Port | Port number of the local node. Zabbix trapper must be listening on this port number. Default is 10051. |
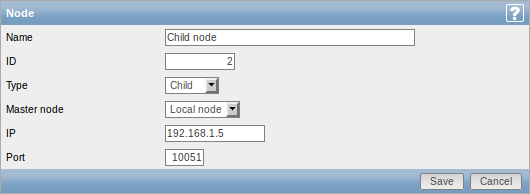
Then add the child node:
- Click on New node in Administration → DM

Node attributes:
| Name | Unique name of the child node. |
| Id | Unique node ID. This is the NodeID from the child node configuration file. |
| Type | Select the first of the two available values: Child - a child node Master - a master node |
| Master node | Select the master node for this child node. |
| IP | IP address of the child node. Zabbix trapper must be listening on this IP address. |
| Port | Port number of the child node. Zabbix trapper must be listening on this port number. Default is 10051. |
Front-end configuration (child node)
To configure the child node, open its Zabbix frontend:
- Go to: Administration → DM
- Make sure that Nodes are selected in the dropdown to the right
- Click on Local node to review its parameters (see above for how to configure the local node)
Then add the master node:
- Click on New node in Administration → DM

Node attributes:
| Name | Unique name of the master node. |
| Id | Unique master node ID. This is the NodeID from the master node configuration file. |
| Type | Select the second of the two available values: Child - a child node Master - a master node |
| IP | IP address of the master node. Zabbix trapper must be listening on this IP address on the master node. |
| Port | Port number of the master node. Zabbix trapper must be listening on this port number. Default is 10051. |
Starting server daemons
To finish configuring a simple distributed setup, start the zabbix_server daemons, beginning with the master node daemon.
Display
As soon as nodes are defined, a dropdown for selecting one or several nodes appears in the Zabbix front-end.

Once selected, all information displayed in the front-end will come from the selected node(s).
More complex configurations
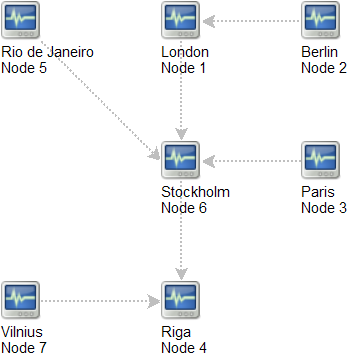
You can use the principles outlined to build more complex, multi-level monitoring hierarchies.
In this example, Riga (Node 4) will collect events and history from all the child nodes.

