Is this not what you were looking for? Switch to the current version or choose one from the drop-down menu.
4 Users
Overview
In the Administration → Users section both user groups and users of the system are maintained.
By default the user group screen is displayed. To switch to the user screen and back, use the dropdown in the top right-hand corner.
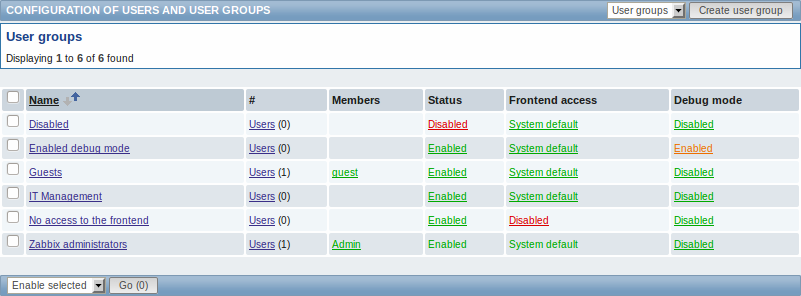
User groups
A listing of existing user groups with their details is displayed.

Displayed data:
| Column | Description |
|---|---|
| Name | Name of the user group. Clicking on the user group name opens the user group configuration form. |
| # | The number of users in the group (displayed in parentheses). Clicking on Users will display the respective users filtered out in the user list. |
| Members | Aliases of individual users in the user group. Clicking on the alias will open the user configuration form. |
| Status | User group status is displayed - Enabled or Disabled. By clicking on the status you can change it. |
| Frontend access | Frontend access level is displayed: System default - Zabbix, LDAP or HTTP authentication; depending on the chosen authentication method Internal - the user is authenticated by Zabbix regardless of system settings Disabled - frontend access for this user is disabled. By clicking on the current level you can change it. |
| Debug mode | Debug mode status is displayed - Enabled or Disabled. By clicking on the status you can change it. |
To configure a new user group, click on the Create user group button in the top right-hand corner.
Mass editing options
A dropdown below the list offers some mass-editing options:
- Enable selected - change the user group status to Enabled
- Disable selected - change the user group status to Disabled
- Enable DEBUG - enable debug mode for the user groups
- Disable DEBUG - disable debug mode for the user groups
- Delete selected - delete the user groups
To use these options, mark the check-boxes before the respective user groups, then select the required option and click on "Go".
Users
A listing of existing users with their details is displayed.

From the dropdown to the right in the Users bar you can choose whether to display all users or those belonging to one particular group.
Displayed data:
| Column | Description |
|---|---|
| Alias | Alias of the user, used for logging into Zabbix. Clicking on the alias opens the user configuration form. |
| Name | First name of the user. |
| Surname | Second name of the user. |
| User type | User type is displayed - Zabbix Super Admin, Zabbix Admin or Zabbix User. |
| Groups | Groups that the user is member of are listed. Clicking on the user group name opens the user group configuration form. |
| Is online? | The on-line status of the user is displayed - Yes or No. The time of last user activity is displayed in parentheses. |
| Login | The login status of the user is displayed - Ok or Blocked. A user can become temporarily blocked upon more than five unsuccessful login attempts. By clicking on Blocked you can unblock the user. |
| Frontend access | Frontend access level is displayed - System default, Internal or Disabled, depending on the one set for the whole user group. |
| Debug mode | Debug mode status is displayed - Enabled or Disabled, depending on the one set for the whole user group. |
| Status | User status is displayed - Enabled or Disabled, depending on the one set for the whole user group. |
To configure a new user, click on the Create user button in the top right-hand corner.
Mass editing options
A dropdown below the list offers some mass-editing options:
- Unblock selected - re-enable system access to blocked users
- Delete selected - delete the users
To use these options, mark the check-boxes before the respective users, then select the required option and click on "Go".
