13 Trapper items
Overview
Trapper items accept incoming data instead of querying for it.
It is useful for any data you might want to "push" into Zabbix.
To use a trapper item you must:
- have a trapper item set up in Zabbix
- send in the data into Zabbix
Configuration
Item configuration
To configure a trapper item:
- Go to: Configuration → Hosts
- Click on Items in the row of the host
- Click on Create item
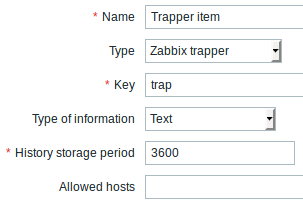
- Enter parameters of the item in the form

All mandatory input fields are marked with a red asterisk.
The fields that require specific information for trapper items are:
| Type | Select Zabbix trapper here. |
| Key | Enter a key that will be used to recognize the item when sending in data. |
| Type of information | Select the type of information that will correspond the format of data that will be sent in. |
| Allowed hosts | List of comma delimited IP addresses, optionally in CIDR notation, or hostnames. If specified, incoming connections will be accepted only from the hosts listed here. If IPv6 support is enabled then '127.0.0.1', '::127.0.0.1', '::ffff:127.0.0.1' are treated equally and '::/0' will allow any IPv4 or IPv6 address. '0.0.0.0/0' can be used to allow any IPv4 address. Note, that "IPv4-compatible IPv6 addresses" (0000::/96 prefix) are supported but deprecated by RFC4291. Example: Server=127.0.0.1,192.168.1.0/24,::1,2001:db8::/32,zabbix.domain Spaces and user macros are allowed in this field since Zabbix 2.2.0. |
You may have to wait up to 60 seconds after saving the item until the server picks up the changes from a configuration cache update, before you can send in values.
Sending in data
In the simplest of cases, we may use zabbix_sender utility to send in some 'test value':
To send in the value we use these keys:
-z - to specify Zabbix server IP address
-p - to specify Zabbix server port number (10051 by default)
-s - to specify the host (make sure to use the 'technical' host name here, instead of the 'visible' name)
-k - to specify the key of the item we just defined
-o - to specify the actual value to send
Zabbix trapper process does not expand macros used in the item key in attempt to check corresponding item key existence for targeted host.
Display
This is the result in Monitoring → Latest data:

