Is this not what you were looking for? Switch to the current version or choose one from the drop-down menu.
7 Scripts
Overview
In the Administration → Scripts section user-defined global scripts can be configured and maintained. Each script can be applied to different hosts as needed. See also Command execution.
The scripts, depending on the set user permissions, are available for execution by clicking on the host in various frontend locations (Dashboard, Problems, Latest data, Maps) and can also be run as an action operation. The scripts are executed on the Zabbix server (proxy) or agent.
Both on Zabbix agent and Zabbix proxy remote scripts are disabled by default. They can be enabled by:
- adding the
AllowKey=system.run[*]parameter in agent configuration; - setting the EnableRemoteCommands parameter to '1' in proxy configuration (also in agent configuration before Zabbix 5.0.2)
A listing of existing scripts with their details is displayed.

Displayed data:
| Column | Description |
|---|---|
| Name | Name of the script. Clicking on the script name opens the script configuration form. |
| Type | Script type is displayed - Script or IPMI command. |
| Execute on | It is displayed whether the script will be executed on Zabbix server or agent. |
| Commands | All commands to be executed within the script are displayed. |
| User group | The user group that the script is available to is displayed (or All for all user groups). |
| Host group | The host group that the script is available for is displayed (or All for all host groups). |
| Host access | The permission level for the host group is displayed - Read or Write. Only users with the required permission level will have access to executing the script. |
To configure a new script, click on the Create script button in the top right-hand corner.
Mass editing options
A button below the list offers one mass-editing option:
- Delete - delete the scripts
To use this option, mark the checkboxes before the respective scripts and click on Delete.
Using filter
You can use the filter to display only the scripts you are interested in. For better search performance, data is searched with macros unresolved.
The Filter link is available above the list of scripts. If you click on it, a filter becomes available where you can filter scripts by name.

Configuring a global script

Script attributes:
| Parameter | Description |
|---|---|
| Name | Unique name of the script. Since Zabbix 2.2 the name can be prefixed with the desired path, for example, Default/, putting the script into the respective directory. When accessing scripts through the menu in monitoring sections, they will be organized according to the given directories.A script cannot have the same name as an existing directory (and vice versa). A script name must be unique within its directory. Unescaped script names are validated for uniqueness, i.e. "Ping" and "\Ping" cannot be added in the same folder. A single backslash escapes any symbol directly after it. For example, characters '/' and '\' can be escaped by backslash, i.e. \/ or \\. |
| Type | Click the respective button to select script type - IPMI command or Script. |
| Execute on | Click the respective button to execute the script on: Zabbix agent - the script will be executed by Zabbix agent (if the system.run item is allowed) on the host Zabbix server (proxy) - the script will be executed by Zabbix server or proxy (if enabled by EnableRemoteCommands - depending on whether the host is monitored by server or proxy Zabbix server - the script will be executed by Zabbix server only |
| Commands | Enter full path to the commands to be executed within the script. The following macros are supported: host-related - {HOST.CONN}, {HOST.IP}, {HOST.DNS}, {HOST.HOST}, {HOST.NAME}; user-related - {USER.ALIAS}, {USER.FULLNAME}, {USER.NAME}, {USER.SURNAME}; custom user macros. Notes: If a macro may resolve to a value with spaces (for example, host name), don't forget to quote as needed. User-related macros are supported since Zabbix 5.0.2 to allow passing information about the user that launched the script. If the script was executed automatically under an action operation, these macros will not be resolved. |
| Description | Enter a description for the script. |
| User group | Select the user group that the script will be available to (or All for all user groups). |
| Host group | Select the host group that the script will be available for (or All for all host groups). |
| Required host permissions | Select the permission level for the host group - Read or Write. Only users with the required permission level will have access to executing the script. |
| Enable confirmation | Mark the checkbox to display a confirmation message before executing the script. This feature might be especially useful with potentially dangerous operations (like a reboot script) or ones that might take a long time. |
| Confirmation text | Enter a custom confirmation text for the confirmation popup enabled with the checkbox above (for example, Remote system will be rebooted. Are you sure?). To see how the text will look like, click on Test confirmation next to the field. All macros supported for script commands are also supported for the confirmation text. Note: the macros will not be expanded when testing the confirmation message. |
Script execution and result
Scripts run by Zabbix server are executed by the order described in Command execution section including exit code checking. The script result will be displayed in a pop-up window that will appear after the script is run.
Note: The return value of the script is standard output together with standard error.
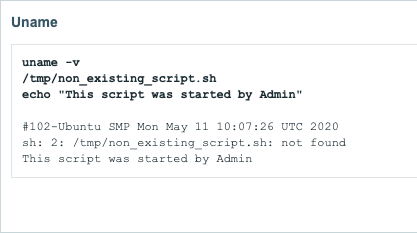
See an example of a script and the result window below:

Script timeout
Zabbix agent
You may encounter a situation when a timeout occurs while executing a script.
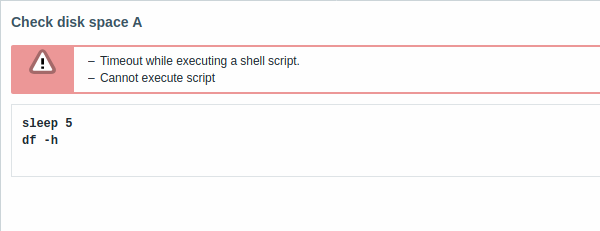
See an example of a script running on Zabbix agent and the result window below:

The error message, in this case, is the following:
In order to avoid such a situation, it is advised to optimize the script itself (instead of adjusting Timeout parameter to a corresponding value (in our case, > ‘5’) by modifying the Zabbix agent configuration and Zabbix server configuration).
In case still the Timeout parameter is changed in Zabbix agent configuration following error message appears:
It means that modification was made in Zabbix agent configuration and it is required to modify Timeout setting also in Zabbix server configuration.
Zabbix server/proxy
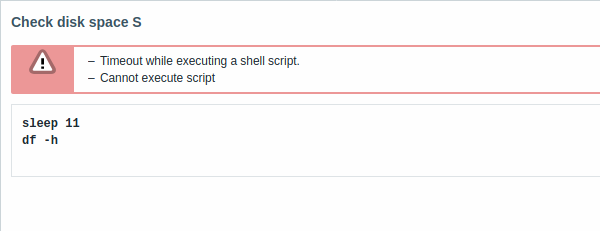
See an example of a script running on Zabbix server and the result window below:

It is also advised to optimize the script itself (instead of adjusting TrapperTimeout parameter to a corresponding value (in our case, > ‘11’) by modifying the Zabbix server configuration).

