This template is for Zabbix version: 7.2
Source: https://git.zabbix.com/projects/ZBX/repos/zabbix/browse/templates/media/pushover?at=release/7.2
Zabbix Pushover webhook integration

With Pushover, a user can be notified the most convenient way — with push notification straight to a mobile device.
Pushover setup
Register the account at https://pushover.net/ and then install Pushover app at your iOS or Android device.
Then click here to create new integration with Zabbix.
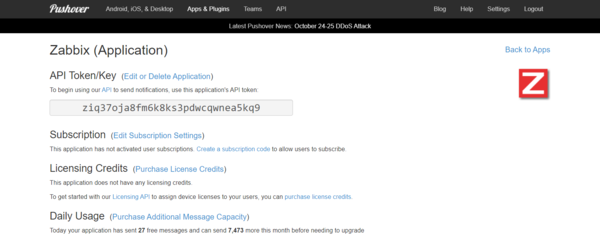
At this point, we have Application API Token (token) of the Zabbix application and Pushover User Key.
You would need both in Zabbix pushover webhook.
Zabbix setup
Set {$ZABBIX.URL} global macro
Go to Administration->General (Macro) and create new macro that points to your Zabbix frontend
{$ZABBIX.URL} = https://myzabbix.local
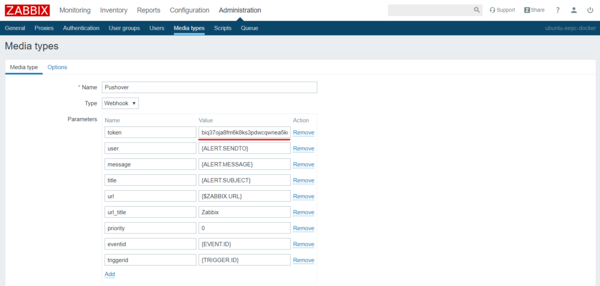
Setup Pushover media type
Proceed to Administration→ Media types at the Zabbix frontend and find Pushover. If you don't have it, import it from the official Zabbix repository here:
https://git.zabbix.com/projects/ZBX/repos/zabbix/browse/templates/media/pushover
Edit Pushover media type parameters and replace token with your Pushover application key.
Setup media in user profile
Next, proceed to your User profile and create new Media of Pushover type, use your User key in Send to field.
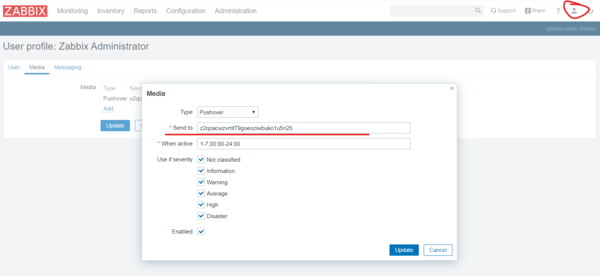
Also, you can customize Pushover message priority for each Zabbix severity. Change value of priority_<severity_name> parameter. It must be between -2 and 2.
By default, messages have normal priority (a priority of 0).
For more information check Pushover documentation.
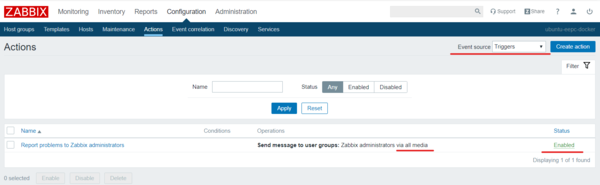
Check trigger actions
Make sure proper trigger actions are set at Configuration→Actions page. For starters, you can enable default "Report problems to Zabbix administrators" rule.
Finally
You are all set! Now break something to receive a notification :)
This template is for Zabbix version: 7.0
Source: https://git.zabbix.com/projects/ZBX/repos/zabbix/browse/templates/media/pushover?at=release/7.0
Zabbix Pushover webhook integration
With Pushover, a user can be notified the most convenient way — with push notification straight to a mobile device.
Pushover setup
Register the account at https://pushover.net/ and then install Pushover app at your iOS or Android device.
Then click here to create new integration with Zabbix.
At this point, we have Application API Token (token) of the Zabbix application and Pushover User Key.
You would need both in Zabbix pushover webhook.
Zabbix setup
Set {$ZABBIX.URL} global macro
Go to Administration->General (Macro) and create new macro that points to your Zabbix frontend
{$ZABBIX.URL} = https://myzabbix.local
Setup Pushover media type
Proceed to Administration→ Media types at the Zabbix frontend and find Pushover. If you don't have it, import it from the official Zabbix repository here:
https://git.zabbix.com/projects/ZBX/repos/zabbix/browse/templates/media/pushover
Edit Pushover media type parameters and replace token with your Pushover application key.
Setup media in user profile
Next, proceed to your User profile and create new Media of Pushover type, use your User key in Send to field.
Also, you can customize Pushover message priority for each Zabbix severity. Change value of priority_<severity_name> parameter. It must be between -2 and 2.
By default, messages have normal priority (a priority of 0).
For more information check Pushover documentation.
Check trigger actions
Make sure proper trigger actions are set at Configuration→Actions page. For starters, you can enable default "Report problems to Zabbix administrators" rule.
Finally
You are all set! Now break something to receive a notification :)
This template is for Zabbix version: 6.4
Source: https://git.zabbix.com/projects/ZBX/repos/zabbix/browse/templates/media/pushover?at=release/6.4
Zabbix Pushover webhook integration
With Pushover, a user can be notified the most convenient way — with push notification straight to a mobile device.
Pushover setup
Register the account at https://pushover.net/ and then install Pushover app at your iOS or Android device.
Then click here to create new integration with Zabbix.
At this point, we have Application API Token (token) of the Zabbix application and Pushover User Key.
You would need both in Zabbix pushover webhook.
Zabbix setup
Set {$ZABBIX.URL} global macro
Go to Administration->General (Macro) and create new macro that points to your Zabbix frontend
{$ZABBIX.URL} = https://myzabbix.local
Setup Pushover media type
Proceed to Administration→ Media types at the Zabbix frontend and find Pushover. If you don't have it, import it from the official Zabbix repository here:
https://git.zabbix.com/projects/ZBX/repos/zabbix/browse/templates/media/pushover
Edit Pushover media type parameters and replace token with your Pushover application key.
Setup media in user profile
Next, proceed to your User profile and create new Media of Pushover type, use your User key in Send to field.
Also, you can customize Pushover message priority for each Zabbix severity. Change value of priority_<severity_name> parameter. It must be between -2 and 2.
By default, messages have normal priority (a priority of 0).
For more information check Pushover documentation.
Check trigger actions
Make sure proper trigger actions are set at Configuration→Actions page. For starters, you can enable default "Report problems to Zabbix administrators" rule.
Finally
You are all set! Now break something to receive a notification :)
This template is for Zabbix version: 6.2
Source: https://git.zabbix.com/projects/ZBX/repos/zabbix/browse/templates/media/pushover?at=release/6.2
Zabbix Pushover webhook integration
With Pushover, a user can be notified the most convenient way — with push notification straight to a mobile device.
Pushover setup
Register the account at https://pushover.net/ and then install Pushover app at your iOS or Android device.
Then click here to create new integration with Zabbix.
At this point, we have Application API Token (token) of the Zabbix application and Pushover User Key.
You would need both in Zabbix pushover webhook.
Zabbix setup
Set {$ZABBIX.URL} global macro
Go to Administration->General (Macro) and create new macro that points to your Zabbix frontend
{$ZABBIX.URL} = https://myzabbix.local
Setup Pushover media type
Proceed to Administration→ Media types at the Zabbix frontend and find Pushover. If you don't have it, import it from the official Zabbix repository here:
https://git.zabbix.com/projects/ZBX/repos/zabbix/browse/templates/media/pushover
Edit Pushover media type parameters and replace token with your Pushover application key.
Setup media in user profile
Next, proceed to your User profile and create new Media of Pushover type, use your User key in Send to field.
Also, you can customize Pushover message priority for each Zabbix severity. Change value of priority_<severity_name> parameter. It must be between -2 and 2.
By default, messages have normal priority (a priority of 0).
For more information check Pushover documentation.
Check trigger actions
Make sure proper trigger actions are set at Configuration→Actions page. For starters, you can enable default "Report problems to Zabbix administrators" rule.
Finally
You are all set! Now break something to receive a notification :)
This template is for Zabbix version: 6.0
Source: https://git.zabbix.com/projects/ZBX/repos/zabbix/browse/templates/media/pushover?at=release/6.0
Zabbix Pushover webhook integration
With Pushover, a user can be notified the most convenient way — with push notification straight to a mobile device.
Pushover setup
Register the account at https://pushover.net/ and then install Pushover app at your iOS or Android device.
Then click here to create new integration with Zabbix.
At this point, we have Application API Token (token) of the Zabbix application and Pushover User Key.
You would need both in Zabbix pushover webhook.
Zabbix setup
Set {$ZABBIX.URL} global macro
Go to Administration->General (Macro) and create new macro that points to your Zabbix frontend
{$ZABBIX.URL} = https://myzabbix.local
Setup Pushover media type
Proceed to Administration→ Media types at the Zabbix frontend and find Pushover. If you don't have it, import it from the official Zabbix repository here:
https://git.zabbix.com/projects/ZBX/repos/zabbix/browse/templates/media/pushover
Edit Pushover media type parameters and replace token with your Pushover application key.
Setup media in user profile
Next, proceed to your User profile and create new Media of Pushover type, use your User key in Send to field.
Also, you can customize Pushover message priority for each Zabbix severity. Change value of priority_<severity_name> parameter. It must be between -2 and 2.
By default, messages have normal priority (a priority of 0).
For more information check Pushover documentation.
Check trigger actions
Make sure proper trigger actions are set at Configuration→Actions page. For starters, you can enable default "Report problems to Zabbix administrators" rule.
Finally
You are all set! Now break something to receive a notification :)
This template is for Zabbix version: 5.4
Source: https://git.zabbix.com/projects/ZBX/repos/zabbix/browse/templates/media/pushover?at=release/5.4
Zabbix Pushover webhook integration
With Pushover, a user can be notified the most convenient way — with push notification straight to a mobile device.
Pushover setup
Register the account at https://pushover.net/ and then install Pushover app at your iOS or Android device.
Then click here to create new integration with Zabbix.
At this point, we have Application API Token (token) of the Zabbix application and Pushover User Key.
You would need both in Zabbix pushover webhook.
Zabbix setup
Set {$ZABBIX.URL} global macro
Go to Administration->General (Macro) and create new macro that points to your Zabbix frontend
{$ZABBIX.URL} = https://myzabbix.local
Setup Pushover media type
Proceed to Administration→ Media types at the Zabbix frontend and find Pushover. If you don't have it, import it from the official Zabbix repository here:
https://git.zabbix.com/projects/ZBX/repos/zabbix/browse/templates/media/pushover
Edit Pushover media type parameters and replace token with your Pushover application key.
Setup media in user profile
Next, proceed to your User profile and create new Media of Pushover type, use your User key in Send to field.
Also, you can customize Pushover message priority for each Zabbix severity. Change value of priority_<severity_name> parameter. It must be between -2 and 2.
By default, messages have normal priority (a priority of 0).
For more information check Pushover documentation.
Check trigger actions
Make sure proper trigger actions are set at Configuration→Actions page. For starters, you can enable default "Report problems to Zabbix administrators" rule.
Finally
You are all set! Now break something to receive a notification :)
This template is for Zabbix version: 5.0
Source: https://git.zabbix.com/projects/ZBX/repos/zabbix/browse/templates/media/pushover?at=release/5.0
Zabbix Pushover webhook integration
With Pushover, a user can be notified the most convenient way — with push notification straight to a mobile device.
Pushover setup
Register the account at https://pushover.net/ and then install Pushover app at your iOS or Android device.
Then click here to create new integration with Zabbix.
At this point, we have Application API Token (token) of the Zabbix application and Pushover User Key.
You would need both in Zabbix pushover webhook.
Zabbix setup
Set {$ZABBIX.URL} global macro
Go to Administration->General (Macro) and create new macro that points to your Zabbix frontend
{$ZABBIX.URL} = https://myzabbix.local
Setup Pushover media type
Proceed to Administration→ Media types at the Zabbix frontend and find Pushover. If you don't have it, import it from the official Zabbix repository here:
https://git.zabbix.com/projects/ZBX/repos/zabbix/browse/templates/media/pushover
Edit Pushover media type parameters and replace token with your Pushover application key.
Setup media in user profile
Next, proceed to your User profile and create new Media of Pushover type, use your User key in Send to field.
Also, you can customize Pushover message priority for each Zabbix severity. Change value of priority_<severity_name> parameter. It must be between -2 and 2.
By default, messages have normal priority (a priority of 0).
For more information check Pushover documentation.
Check trigger actions
Make sure proper trigger actions are set at Configuration→Actions page. For starters, you can enable default "Report problems to Zabbix administrators" rule.
Finally
You are all set! Now break something to receive a notification :)


