This template is for Zabbix version: 7.4
Source: https://git.zabbix.com/projects/ZBX/repos/zabbix/browse/templates/media/zammad?at=release/7.4

Zammad webhook
Overview
This guide describes how to integrate your Zabbix installation with Zammad using the Zabbix webhook feature, providing instructions on setting up a media type, user, and action in Zabbix.
Requirements
Zabbix version: 7.4 and higher.
Parameters
After importing the webhook, you can configure it using webhook parameters.
Configurable parameters
The configurable parameters are intended to be changed according to the webhook setup as well as the user's preferences and environment.
| Name |
Value |
Description |
| zabbix_url |
{$ZABBIX.URL} |
The URL of the Zabbix frontend. |
| zammad_access_token |
<PUT YOUR ACCESS TOKEN> |
Zammad access token. |
| zammad_customer |
<PUT YOUR CUSTOMER EMAIL> |
Zammad customer email. |
| zammad_group |
Users |
Zammad user group. Change if needed. |
| zammad_enable_tags |
false |
Zammad enable tags toggle. Zabbix event tags will be added to Zammad tickets if it is set to one of the following values: 1, true, yes, on. |
| zammad_url |
<PUT YOUR ZAMMAD URL> |
Zammad URL. |
Internal parameters
Internal parameters are reserved for predefined macros that are not meant to be changed.
| Name |
Value |
Description |
| event_source |
{EVENT.SOURCE} |
Numeric value of the event source. Possible values: 0 - Trigger, 1 - Discovery, 2 - Autoregistration, 3 - Internal, 4 - Service. |
| event_value |
{EVENT.VALUE} |
Numeric value of the event that triggered an action (1 for problem, 0 for recovering). |
| event_nseverity |
{EVENT.NSEVERITY} |
Numeric value of the event severity. Possible values: 0 - Not classified, 1 - Information, 2 - Warning, 3 - Average, 4 - High, 5 - Disaster. |
| event_severity |
{EVENT.SEVERITY} |
Name of the event severity. |
| event_update_nseverity |
{EVENT.UPDATE.NSEVERITY} |
Numeric value of the event update severity. Possible values: 0 - Not classified, 1 - Information, 2 - Warning, 3 - Average, 4 - High, 5 - Disaster. |
| event_update_severity |
{EVENT.UPDATE.SEVERITY} |
Name of the event update severity. |
| event_update_status |
{EVENT.UPDATE.STATUS} |
Numeric value of the problem update status. Possible values: 0 - Webhook was called because of problem/recovery event, 1 - Update operation. |
| alert_subject |
{ALERT.SUBJECT} |
'Default subject' value from action configuration. |
| alert_message |
{ALERT.MESSAGE} |
'Default message' value from action configuration. |
| trigger_id |
{TRIGGER.ID} |
Numeric ID of the trigger of this action. |
| event_id |
{EVENT.ID} |
Numeric ID of the event that triggered an action. |
| event_tags |
{EVENT.TAGSJSON} |
A JSON array containing event tag objects. Expanded to an empty array if no tags exist. |
Please be aware that each webhook supports an HTTP proxy. To use this feature, add a new media type parameter with the name http_proxy and set its value to the proxy URL.
Service setup
- Check that API Token Access is enabled in Settings > System > API.
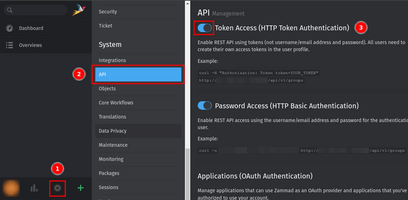
- Open the profile settings of the customer user and create a new Personal User Token.
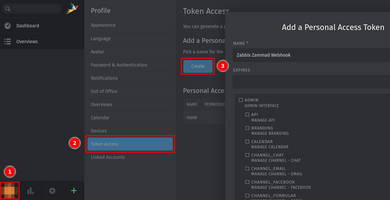
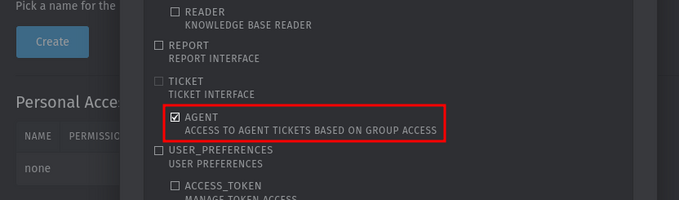
- Set the
ticket.agent permission for the token and press Create.
- Copy and save the created token somewhere, as, for security reasons, it will be shown only once!
Zabbix configuration
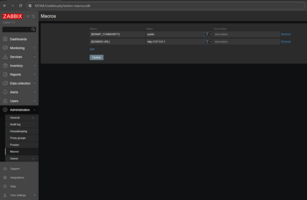
- Before you can start using the Zammad webhook, you need to set up the global macro
{$ZABBIX.URL}:
- In the Zabbix web interface, go to Administration > Macros in the top-left dropdown menu.
- Set up the global macro
{$ZABBIX.URL} which will contain the URL to the Zabbix frontend. The URL should be either an IP address, a fully qualified domain name, or a localhost.
- Specifying a protocol is mandatory, whereas the port is optional. Depending on the web server configuration, you might also need to append
/zabbix to the end of URL. Good examples:
http://zabbix.comhttps://zabbix.lan/zabbixhttp://server.zabbix.lan/http://localhosthttp://127.0.0.1:8080
- Bad examples:
zabbix.comhttp://zabbix/
- Import the media type:
- Open the imported Zammad media type and set the following webhook parameters:
zammad_access_token - the access token that you created during Zammad configurationzammad_url - the frontend URL of your Zammad installationzammad_customer - the Zammad user emailzammad_enable_tags - if you want to add the Zabbix event tags to the Zammad tickets that are created, you can set it to one of the following values: 1, true, yes, on (note that if tag support is enabled, each tag is sent via a separate HTTP request and the created tags will also remain in Zammad when tickets are closed/deleted)zammad_group - if needed, you can change the Zammad user group
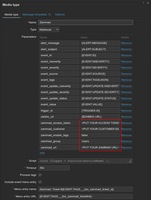
- If you want to prioritize issues according to the severity values in Zabbix, you can define mapping parameters (create them as additional webhook parameters):
severity_<name> - the Zammad priority ID (<name> in the parameter name can be one of the following values: not_classified, information, warning, average, high, disaster)

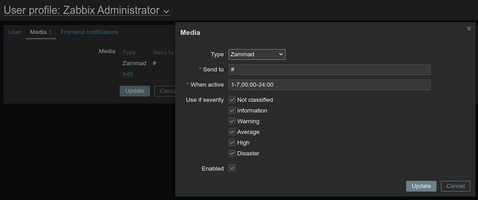
- Create a Zabbix user and add media:
- If you want to create a new user, go to the Users > Users section and click the Create user button in the top-right corner. In the User tab, fill in all the required fields (marked with red asterisks).
- In the Media tab, add a new media and select Zammad from the Type drop-down list. Though the Send to field is not used in the Zammad webhook, it cannot be left empty. To comply with frontend requirements, enter any symbol in the field.
- Make sure this user has access to all the hosts for which you would like problem notifications to be sent to Zammad.
- Done! You can now start using this media type in actions and create tickets.
For more information, please see Zabbix and Zammad documentation.
Feedback
Please report any issues with the media type at https://support.zabbix.com.
You can also provide feedback, discuss the media type, or ask for help at ZABBIX forums.
This template is for Zabbix version: 7.2
Source: https://git.zabbix.com/projects/ZBX/repos/zabbix/browse/templates/media/zammad?at=release/7.2
Zammad webhook
Overview
This guide describes how to integrate your Zabbix installation with Zammad using the Zabbix webhook feature, providing instructions on setting up a media type, user, and action in Zabbix.
Requirements
Zabbix version: 7.2 and higher.
Parameters
After importing the webhook, you can configure it using webhook parameters.
Configurable parameters
The configurable parameters are intended to be changed according to the webhook setup as well as the user's preferences and environment.
| Name |
Value |
Description |
| zabbix_url |
{$ZABBIX.URL} |
The URL of the Zabbix frontend. |
| zammad_access_token |
<PUT YOUR ACCESS TOKEN> |
Zammad access token. |
| zammad_customer |
<PUT YOUR CUSTOMER EMAIL> |
Zammad customer email. |
| zammad_group |
Users |
Zammad user group. Change if needed. |
| zammad_enable_tags |
false |
Zammad enable tags toggle. Zabbix event tags will be added to Zammad tickets if it is set to one of the following values: 1, true, yes, on. |
| zammad_url |
<PUT YOUR ZAMMAD URL> |
Zammad URL. |
Internal parameters
Internal parameters are reserved for predefined macros that are not meant to be changed.
| Name |
Value |
Description |
| event_source |
{EVENT.SOURCE} |
Numeric value of the event source. Possible values: 0 - Trigger, 1 - Discovery, 2 - Autoregistration, 3 - Internal, 4 - Service. |
| event_value |
{EVENT.VALUE} |
Numeric value of the event that triggered an action (1 for problem, 0 for recovering). |
| event_nseverity |
{EVENT.NSEVERITY} |
Numeric value of the event severity. Possible values: 0 - Not classified, 1 - Information, 2 - Warning, 3 - Average, 4 - High, 5 - Disaster. |
| event_severity |
{EVENT.SEVERITY} |
Name of the event severity. |
| event_update_nseverity |
{EVENT.UPDATE.NSEVERITY} |
Numeric value of the event update severity. Possible values: 0 - Not classified, 1 - Information, 2 - Warning, 3 - Average, 4 - High, 5 - Disaster. |
| event_update_severity |
{EVENT.UPDATE.SEVERITY} |
Name of the event update severity. |
| event_update_status |
{EVENT.UPDATE.STATUS} |
Numeric value of the problem update status. Possible values: 0 - Webhook was called because of problem/recovery event, 1 - Update operation. |
| alert_subject |
{ALERT.SUBJECT} |
'Default subject' value from action configuration. |
| alert_message |
{ALERT.MESSAGE} |
'Default message' value from action configuration. |
| trigger_id |
{TRIGGER.ID} |
Numeric ID of the trigger of this action. |
| event_id |
{EVENT.ID} |
Numeric ID of the event that triggered an action. |
| event_tags |
{EVENT.TAGSJSON} |
A JSON array containing event tag objects. Expanded to an empty array if no tags exist. |
Please be aware that each webhook supports an HTTP proxy. To use this feature, add a new media type parameter with the name http_proxy and set its value to the proxy URL.
Service setup
- Check that API Token Access is enabled in Settings > System > API.
- Open the profile settings of the customer user and create a new Personal User Token.
- Set the
ticket.agent permission for the token and press Create.
- Copy and save the created token somewhere, as, for security reasons, it will be shown only once!
Zabbix configuration
- Before you can start using the Zammad webhook, you need to set up the global macro
{$ZABBIX.URL}:
- In the Zabbix web interface, go to Administration > Macros in the top-left dropdown menu.
- Set up the global macro
{$ZABBIX.URL} which will contain the URL to the Zabbix frontend. The URL should be either an IP address, a fully qualified domain name, or a localhost.
- Specifying a protocol is mandatory, whereas the port is optional. Depending on the web server configuration, you might also need to append
/zabbix to the end of URL. Good examples:
http://zabbix.comhttps://zabbix.lan/zabbixhttp://server.zabbix.lan/http://localhosthttp://127.0.0.1:8080
- Bad examples:
zabbix.comhttp://zabbix/
- Import the media type:
- Open the imported Zammad media type and set the following webhook parameters:
zammad_access_token - the access token that you created during Zammad configurationzammad_url - the frontend URL of your Zammad installationzammad_customer - the Zammad user emailzammad_enable_tags - if you want to add the Zabbix event tags to the Zammad tickets that are created, you can set it to one of the following values: 1, true, yes, on (note that if tag support is enabled, each tag is sent via a separate HTTP request and the created tags will also remain in Zammad when tickets are closed/deleted)zammad_group - if needed, you can change the Zammad user group
- If you want to prioritize issues according to the severity values in Zabbix, you can define mapping parameters (create them as additional webhook parameters):
severity_<name> - the Zammad priority ID (<name> in the parameter name can be one of the following values: not_classified, information, warning, average, high, disaster)
- Create a Zabbix user and add media:
- If you want to create a new user, go to the Users > Users section and click the Create user button in the top-right corner. In the User tab, fill in all the required fields (marked with red asterisks).
- In the Media tab, add a new media and select Zammad from the Type drop-down list. Though the Send to field is not used in the Zammad webhook, it cannot be left empty. To comply with frontend requirements, enter any symbol in the field.
- Make sure this user has access to all the hosts for which you would like problem notifications to be sent to Zammad.
- Done! You can now start using this media type in actions and create tickets.
For more information, please see Zabbix and Zammad documentation.
Feedback
Please report any issues with the media type at https://support.zabbix.com.
You can also provide feedback, discuss the media type, or ask for help at ZABBIX forums.
This template is for Zabbix version: 7.0
Source: https://git.zabbix.com/projects/ZBX/repos/zabbix/browse/templates/media/zammad?at=release/7.0
Zammad webhook
Overview
This guide describes how to integrate your Zabbix installation with Zammad using the Zabbix webhook feature, providing instructions on setting up a media type, user, and action in Zabbix.
Requirements
Zabbix version: 7.0 and higher.
Parameters
After importing the webhook, you can configure it using webhook parameters.
Configurable parameters
The configurable parameters are intended to be changed according to the webhook setup as well as the user's preferences and environment.
| Name |
Value |
Description |
| zabbix_url |
{$ZABBIX.URL} |
The URL of the Zabbix frontend. |
| zammad_access_token |
<PUT YOUR ACCESS TOKEN> |
Zammad access token. |
| zammad_customer |
<PUT YOUR CUSTOMER EMAIL> |
Zammad customer email. |
| zammad_group |
Users |
Zammad user group. Change if needed. |
| zammad_enable_tags |
false |
Zammad enable tags toggle. Zabbix event tags will be added to Zammad tickets if it is set to one of the following values: 1, true, yes, on. |
| zammad_url |
<PUT YOUR ZAMMAD URL> |
Zammad URL. |
Internal parameters
Internal parameters are reserved for predefined macros that are not meant to be changed.
| Name |
Value |
Description |
| event_source |
{EVENT.SOURCE} |
Numeric value of the event source. Possible values: 0 - Trigger, 1 - Discovery, 2 - Autoregistration, 3 - Internal, 4 - Service. |
| event_value |
{EVENT.VALUE} |
Numeric value of the event that triggered an action (1 for problem, 0 for recovering). |
| event_nseverity |
{EVENT.NSEVERITY} |
Numeric value of the event severity. Possible values: 0 - Not classified, 1 - Information, 2 - Warning, 3 - Average, 4 - High, 5 - Disaster. |
| event_severity |
{EVENT.SEVERITY} |
Name of the event severity. |
| event_update_nseverity |
{EVENT.UPDATE.NSEVERITY} |
Numeric value of the event update severity. Possible values: 0 - Not classified, 1 - Information, 2 - Warning, 3 - Average, 4 - High, 5 - Disaster. |
| event_update_severity |
{EVENT.UPDATE.SEVERITY} |
Name of the event update severity. |
| event_update_status |
{EVENT.UPDATE.STATUS} |
Numeric value of the problem update status. Possible values: 0 - Webhook was called because of problem/recovery event, 1 - Update operation. |
| alert_subject |
{ALERT.SUBJECT} |
'Default subject' value from action configuration. |
| alert_message |
{ALERT.MESSAGE} |
'Default message' value from action configuration. |
| trigger_id |
{TRIGGER.ID} |
Numeric ID of the trigger of this action. |
| event_id |
{EVENT.ID} |
Numeric ID of the event that triggered an action. |
| event_tags |
{EVENT.TAGSJSON} |
A JSON array containing event tag objects. Expanded to an empty array if no tags exist. |
Please be aware that each webhook supports an HTTP proxy. To use this feature, add a new media type parameter with the name http_proxy and set its value to the proxy URL.
Service setup
- Check that API Token Access is enabled in Settings > System > API.
- Open the profile settings of the customer user and create a new Personal User Token.
- Set the
ticket.agent permission for the token and press Create.
- Copy and save the created token somewhere, as, for security reasons, it will be shown only once!
Zabbix configuration
- Before you can start using the Zammad webhook, you need to set up the global macro
{$ZABBIX.URL}:
- In the Zabbix web interface, go to Administration > Macros in the top-left dropdown menu.
- Set up the global macro
{$ZABBIX.URL} which will contain the URL to the Zabbix frontend. The URL should be either an IP address, a fully qualified domain name, or a localhost.
- Specifying a protocol is mandatory, whereas the port is optional. Depending on the web server configuration, you might also need to append
/zabbix to the end of URL. Good examples:
http://zabbix.comhttps://zabbix.lan/zabbixhttp://server.zabbix.lan/http://localhosthttp://127.0.0.1:8080
- Bad examples:
zabbix.comhttp://zabbix/
- Import the media type:
- Open the imported Zammad media type and set the following webhook parameters:
zammad_access_token - the access token that you created during Zammad configurationzammad_url - the frontend URL of your Zammad installationzammad_customer - the Zammad user emailzammad_enable_tags - if you want to add the Zabbix event tags to the Zammad tickets that are created, you can set it to one of the following values: 1, true, yes, on (note that if tag support is enabled, each tag is sent via a separate HTTP request and the created tags will also remain in Zammad when tickets are closed/deleted)zammad_group - if needed, you can change the Zammad user group
- If you want to prioritize issues according to the severity values in Zabbix, you can define mapping parameters (create them as additional webhook parameters):
severity_<name> - the Zammad priority ID (<name> in the parameter name can be one of the following values: not_classified, information, warning, average, high, disaster)
- Create a Zabbix user and add media:
- If you want to create a new user, go to the Users > Users section and click the Create user button in the top-right corner. In the User tab, fill in all the required fields (marked with red asterisks).
- In the Media tab, add a new media and select Zammad from the Type drop-down list. Though the Send to field is not used in the Zammad webhook, it cannot be left empty. To comply with frontend requirements, enter any symbol in the field.
- Make sure this user has access to all the hosts for which you would like problem notifications to be sent to Zammad.
- Done! You can now start using this media type in actions and create tickets.
For more information, please see Zabbix and Zammad documentation.
Feedback
Please report any issues with the media type at https://support.zabbix.com.
You can also provide feedback, discuss the media type, or ask for help at ZABBIX forums.
This template is for Zabbix version: 6.4
Source: https://git.zabbix.com/projects/ZBX/repos/zabbix/browse/templates/media/zammad?at=release/6.4
Zammad webhook

This guide describes how to integrate your Zabbix 6.2 installation with Zammad using the Zabbix webhook feature. This guide will provide instructions on setting up a media type, a user and an action in Zabbix.
Requirements
- Zammad with enabled HTTP Token Authentication
- Zabbix version 6.2 or higher
Setting up a Zammad
1. Enable API Token Access in Settings > System > API.

2. Create a new user for a Zabbix alerter with an email address and create a personal user token with ticket.agent permissions.

Zabbix Webhook configuration
Create a global macro
1. Before setting up the Webhook, you need to setup the global macro {$ZABBIX.URL}, which must contain the URL to the Zabbix frontend.

2. In the Administration > Media types section, import the media_zammad.yaml
3. Open the added Zammad media type and set:
- zammad_access_token to the your Personal User Token
- zammad_url to the frontend URL of your Zammad installation
- zammad_customer to your Zammad user email.
- zammad_enable_tags to true or false to enable or disable trigger tags. Important: if you enable tag support, each tag is set with a separate request.

4. If you want to prioritize issues according to severity values in Zabbix, you can define mapping parameters:
- severity_<name>: Zammad priority ID

6. Click the Update button to save the Webhook settings.
7. To receive notifications in Zammad, you need to create a Zabbix user and add Media with the Zammad type.
For Send to: enter any text, as this value is not used, but is required.

For more information, use the Zabbix and Zammad documentations.
Supported Versions
Zabbix 6.2
This template is for Zabbix version: 6.2
Source: https://git.zabbix.com/projects/ZBX/repos/zabbix/browse/templates/media/zammad?at=release/6.2
Zammad webhook
This guide describes how to integrate your Zabbix 6.2 installation with Zammad using the Zabbix webhook feature. This guide will provide instructions on setting up a media type, a user and an action in Zabbix.
Requirements
- Zammad with enabled HTTP Token Authentication
- Zabbix version 6.2 or higher
Setting up a Zammad
1. Enable API Token Access in Settings > System > API.
2. Create a new user for a Zabbix alerter with an email address and create a personal user token with ticket.agent permissions.
Zabbix Webhook configuration
Create a global macro
1. Before setting up the Webhook, you need to setup the global macro {$ZABBIX.URL}, which must contain the URL to the Zabbix frontend.
2. In the Administration > Media types section, import the media_zammad.yaml
3. Open the added Zammad media type and set:
- zammad_access_token to the your Personal User Token
- zammad_url to the frontend URL of your Zammad installation
- zammad_customer to your Zammad user email.
- zammad_enable_tags to true or false to enable or disable trigger tags. Important: if you enable tag support, each tag is set with a separate request.
4. If you want to prioritize issues according to severity values in Zabbix, you can define mapping parameters:
- severity_<name>: Zammad priority ID
6. Click the Update button to save the Webhook settings.
7. To receive notifications in Zammad, you need to create a Zabbix user and add Media with the Zammad type.
For Send to: enter any text, as this value is not used, but is required.
For more information, use the Zabbix and Zammad documentations.
Supported Versions
Zabbix 6.2
This template is for Zabbix version: 6.0
Source: https://git.zabbix.com/projects/ZBX/repos/zabbix/browse/templates/media/zammad?at=release/6.0
Zammad webhook
This guide describes how to integrate your Zabbix 5.0 installation with Zammad using the Zabbix webhook feature. This guide will provide instructions on setting up a media type, a user and an action in Zabbix.
Requirements
- Zammad with enabled HTTP Token Authentication
- Zabbix version 5.0 or higher
Setting up a Zammad
1. Enable API Token Access in Settings > System > API.
2. Create a new user for a Zabbix alerter with an email address and create a personal user token with ticket.agent permissions.
Zabbix Webhook configuration
Create a global macro
1. Before setting up the Webhook, you need to setup the global macro {$ZABBIX.URL}, which must contain the URL to the Zabbix frontend.
2. In the Administration > Media types section, import the media_zammad.yaml
3. Open the added Zammad media type and set:
- zammad_access_token to the your Personal User Token
- zammad_url to the frontend URL of your Zammad installation
- zammad_customer to your Zammad user email.
- zammad_enable_tags to true or false to enable or disable trigger tags. Important: if you enable tag support, each tag is set with a separate request.
4. If you want to prioritize issues according to severity values in Zabbix, you can define mapping parameters:
- severity_<name>: Zammad priority ID
6. Click the Update button to save the Webhook settings.
7. To receive notifications in Zammad, you need to create a Zabbix user and add Media with the Zammad type.
For Send to: enter any text, as this value is not used, but is required.
For more information, use the Zabbix and Zammad documentations.
Supported Versions
Zabbix 5.0
This template is for Zabbix version: 5.4
Source: https://git.zabbix.com/projects/ZBX/repos/zabbix/browse/templates/media/zammad?at=release/5.4
Zammad webhook
This guide describes how to integrate your Zabbix 5.0 installation with Zammad using the Zabbix webhook feature. This guide will provide instructions on setting up a media type, a user and an action in Zabbix.
Requirements
- Zammad with enabled HTTP Token Authentication
- Zabbix version 5.0 or higher
Setting up a Zammad
1. Enable API Token Access in Settings > System > API.
2. Create a new user for a Zabbix alerter with an email address and create a personal user token with ticket.agent permissions.
Zabbix Webhook configuration
Create a global macro
1. Before setting up the Webhook, you need to setup the global macro {$ZABBIX.URL}, which must contain the URL to the Zabbix frontend.
2. In the Administration > Media types section, import the media_zammad.yaml
3. Open the added Zammad media type and set:
- zammad_access_token to the your Personal User Token
- zammad_url to the frontend URL of your Zammad installation
- zammad_customer to your Zammad user email.
- zammad_enable_tags to true or false to enable or disable trigger tags. Important: if you enable tag support, each tag is set with a separate request.
4. If you want to prioritize issues according to severity values in Zabbix, you can define mapping parameters:
- severity_<name>: Zammad priority ID
6. Click the Update button to save the Webhook settings.
7. To receive notifications in Zammad, you need to create a Zabbix user and add Media with the Zammad type.
For Send to: enter any text, as this value is not used, but is required.
For more information, use the Zabbix and Zammad documentations.
Supported Versions
Zabbix 5.0
This template is for Zabbix version: 5.0
Source: https://git.zabbix.com/projects/ZBX/repos/zabbix/browse/templates/media/zammad?at=release/5.0
Zammad webhook
This guide describes how to integrate your Zabbix 5.0 installation with Zammad using the Zabbix webhook feature. This guide will provide instructions on setting up a media type, a user and an action in Zabbix.
Requirements
- Zammad with enabled HTTP Token Authentication
- Zabbix version 5.0 or higher
Setting up a Zammad
1. Enable API Token Access in Settings > System > API.
2. Create a new user for a Zabbix alerter with an email address and create a personal user token with ticket.agent permissions.
Zabbix Webhook configuration
Create a global macro
1. Before setting up the Webhook, you need to setup the global macro {$ZABBIX.URL}, which must contain the URL to the Zabbix frontend.
2. In the Administration > Media types section, import the media_zammad.xml
3. Open the added Zammad media type and set:
- zammad_access_token to the your Personal User Token
- zammad_url to the frontend URL of your Zammad installation
- zammad_customer to your Zammad user email.
- zammad_enable_tags to true or false to enable or disable trigger tags. Important: if you enable tag support, each tag is set with a separate request.
4. If you want to prioritize issues according to severity values in Zabbix, you can define mapping parameters:
- severity_<name>: Zammad priority ID
6. Click the Update button to save the Webhook settings.
7. To receive notifications in Zammad, you need to create a Zabbix user and add Media with the Zammad type.
For Send to: enter any text, as this value is not used, but is required.
For more information, use the Zabbix and Zammad documentations.
Supported Versions
Zabbix 5.0


